

[Please read before construction]
Due to the nature of natural wood, solid wood flooring may warp, crack, or twist depending on the storage conditions and usage environment. Also, due to the influence of moisture in the air and humidity from beneath the floor, "expansion" and "contraction" may occur, which may cause problems depending on the construction situation.
In order to ensure a comfortable life for the owner, please be sure to read these precautions carefully before storing, installing, and maintaining the product, and fully understand the characteristics of solid wood before installing.
If you have any questions about the product or its construction, please contact us or our dealer.
Precautions for storage
- Avoid storing in places where it is easily exposed to water, high humidity, or direct sunlight.
- For storage, place the ringgit at the same height on a level surface and store it horizontally.
- Shrink-packed items will discolor due to UV rays, so be sure to cover them with a plastic sheet, etc.
Check before construction
- Due to the nature of hardwood, be sure to leave it unpacked to prevent it from expanding or contracting due to the nature of natural wood and allowing it to fully acclimate to the construction site environment.
- Please note that due to the nature of softwood, if left unpacked for a long time, warping, cracking, or twisting may occur depending on the environment at the construction site.
- This product is for interior use, so please refrain from using it for exterior use.
- For underfloor heating, please use our recommended flooring.
- Please check whether the ventilation openings are sufficient. If there is insufficient ventilation under the floor, ``unruly'', ``uplifting'', and ``floor rumbling'' may occur after construction.
- Please install this after installing openings such as sash parts to prevent the base material and the installed flooring from getting wet due to rain.
Base construction
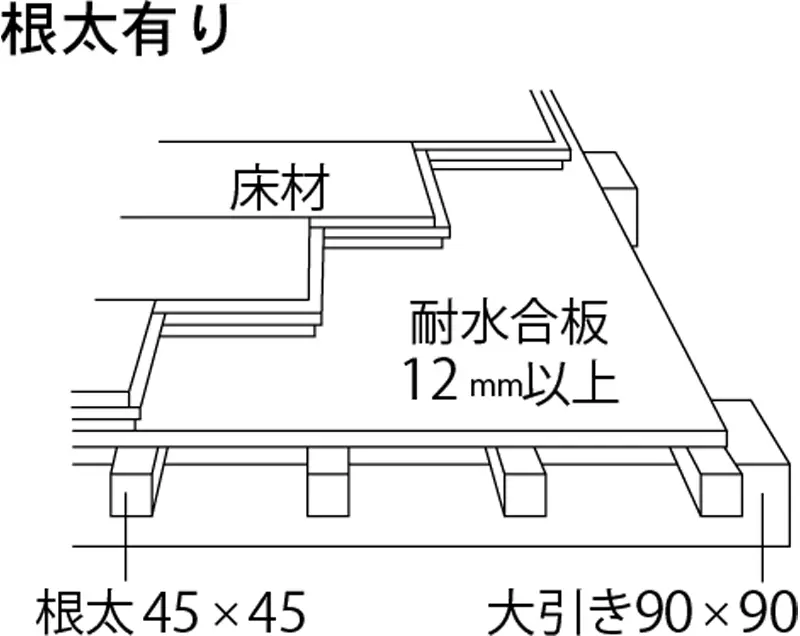
With joists
- Use dry lumber that is at least 90 mm square for the large drawers, and 45 mm square or more for the joists, and finish it smooth with a planer.
- The spacing between the joists should be 3 shaku (909 mm), the joists should be 1 shaku (303 mm), and the construction should be carried out level (horizontally).
- If dry material is not used, the material may become twisted or thin after installation, causing treading.
- If the thickness of the joists is not constant, there will be differences in the height of the joists, which can cause treading.
- Be sure to paste plywood and use water-resistant plywood with a thickness of 12 mm or more. Also, please leave a gap of 2 to 3 mm between the discarded plywood boards.
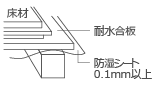
- If there is a lot of moisture under the floor, install a moisture-proof sheet with a thickness of 0.1 mm or more between the joists and the plywood, or caulk and tape the joints to prevent moisture from seeping in from under the floor. please.
- Please note that even if the surface of the concrete under the floor is dry, it still contains moisture inside.
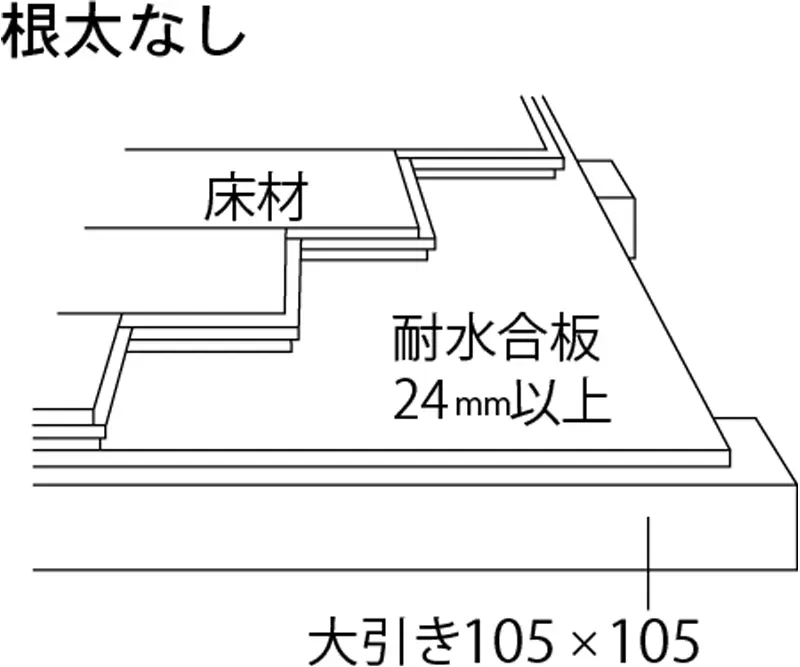
No joists
- For large pulls, use dry lumber of 105 mm square or more, and finish it smooth with a planer.
- The spacing between the main lines should be 3 shaku (909 mm), and the construction should be carried out level (horizontally).
- Be sure to use water-resistant plywood of 24 mm or more.
- If there is a lot of moisture under the floor, install a moisture-proof sheet with a thickness of 0.1 mm or more between the joists and the plywood, or caulk and tape the joints to prevent moisture from seeping in from under the floor. .
Moisture-proof treatment
To prevent the flooring from swelling, the concrete under the floor should be thoroughly dried until the moisture content is below 10%, and should be well ventilated.
Also, be sure to insert a moisture-proof sheet under the waterproof plywood. Additionally, make sure the underlying plywood is free of moisture.
Temporary arrangement
Since it is made of natural wood, each piece will vary in color and grain.
Before we start pasting, we will temporarily arrange the pieces and check the balance of color and wood pattern, and also check the quality of each piece for defects in processing, scratches, and if it is a painted item, that there are no uneven coatings. Please carry out construction.
- If you notice any defects in processing or painting, please contact us before installation.
- In the case of coniferous wood, there may be some defects (such as resin lines, resin spots, dead knots, black knots, joint cracks, chips, minor cracks, etc.).
allocation
- Please allocate the material before pasting to avoid extremely narrow materials.
- Make sure that the joints of the base plywood and the flooring do not overlap.
Paste
hardwood flooring
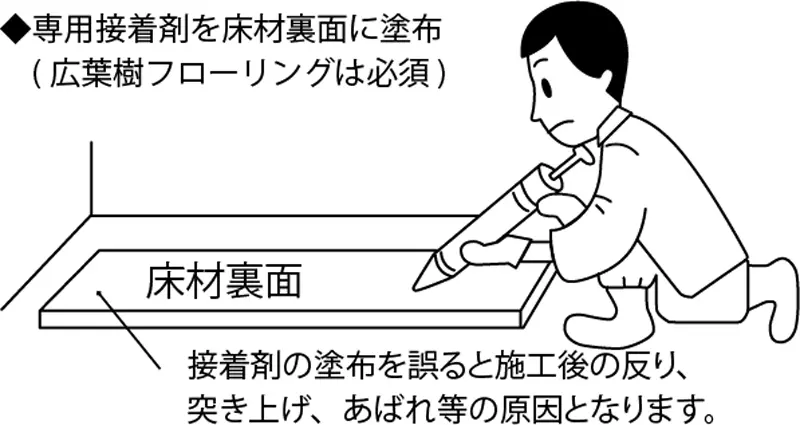
- Be sure to use adhesive and floor staples together when installing. Please use a one-component urethane resin adhesive that is F☆☆☆☆ certified.
- Related recommended adhesives Ausica Selecty UR-20, UR-21
- Do not use water-soluble adhesives as they may cause floor noise.
- Do not use adhesive on the edges or nearby areas.
- Due to the nature of solid wood, if you hit the hammer too hard, it may warp or push up.
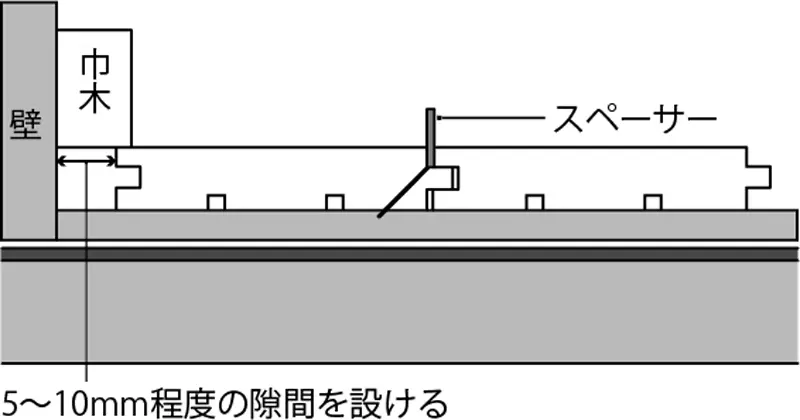
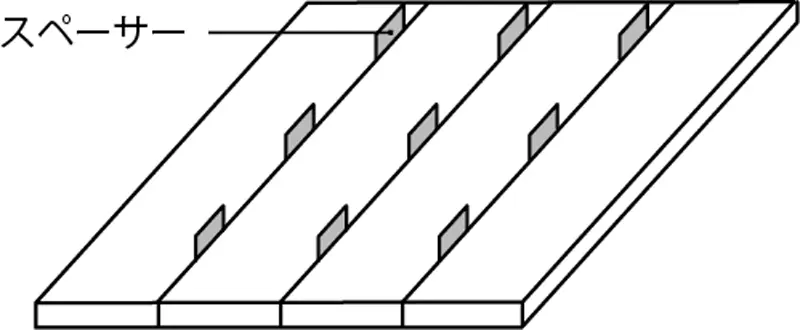
- Be sure to use a "spacer" to provide clearance at the joint. Also, please leave a gap of about 5 to 10 mm near the wall.
softwood flooring
- Insert the male strip into the female strip and stick it up without leaving any gaps.
- If using adhesive, please use F☆☆☆☆ certified one-component urethane resin system.
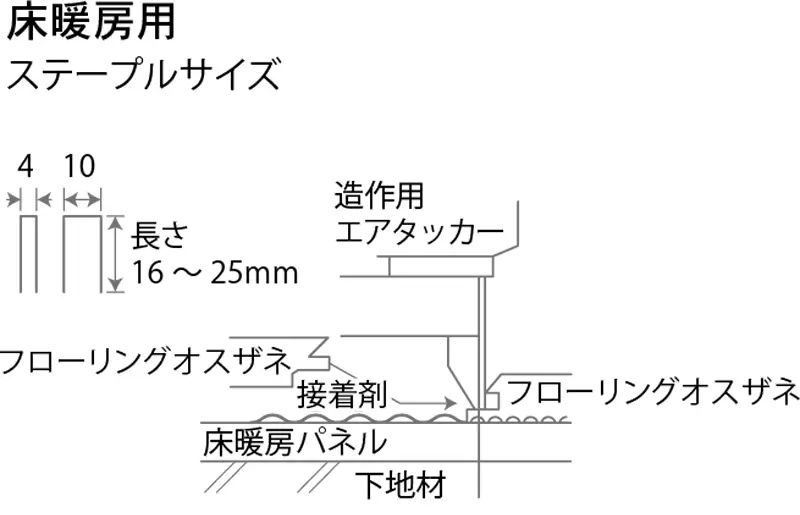
floor heating flooring
- Insert the male seal firmly into the female seal and paste it without leaving any gaps.
- If there is a cut, please apply urethane resin paint to the cut edge to reduce shrinkage and expansion.
- While underfloor heating is in use, moisture may be released and shrink, creating a gap of about 1 to 2 mm, but when it is not in use in the summer, it absorbs moisture and expands, making it less noticeable to some extent.
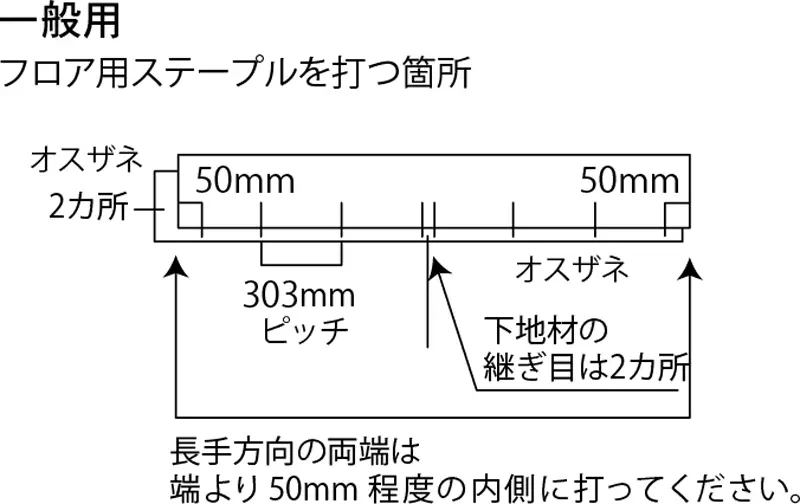
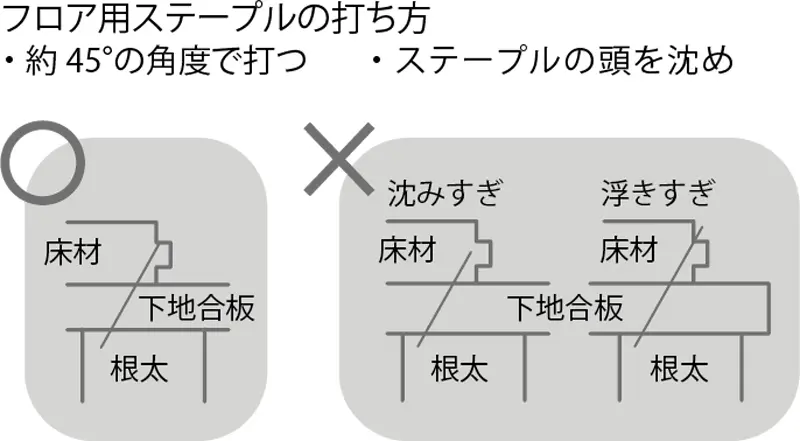
Secure with floor staples
Health care
- Immediately after installation, please completely remove all dirt and dust. Prevents fine scratches from forming on the flooring surface. After cleaning thoroughly, cover the entire surface with a curing sheet or curing board to protect the surface.
- Do not apply curing tape directly to solid wood flooring. Adhesive tape may cause the paint to peel off, or the adhesive may adhere to the material, causing stains or discoloration. Also, be careful not to get plasterboard powder into the wood grain.
- Once the wall is up, use the product's cardboard to attach curing tape to the wall.
- Please refer to the diagram on the right.
- If you must apply curing tape directly to the flooring, use one with weak adhesive strength and remove it as quickly as possible.
- Natural wood flooring continues to breathe even after installation. After curing during the construction period, the environment is extremely harsh. Before handing over the product, please make sure to install it correctly to avoid scratches, warping, and bumps.